How to Make a Culinary Fall Wreath Using Wild Grapevines and Herbs From the Garden
As summer dwindles and the first frost approaches, it’s time to start thinking about ways to hold over any garden surplus through the winter. Drying and freezing are two popular ways to preserve garden herbs. Crafting a fall wreath is one way of drying herbs which has become my absolute favorite this time of year.
When I was growing up, my family made wreaths for every season using hot glue guns, found objects from nature, silk flowers, and seasonal bobbles from the craft store. It was always a fun time as we decided on the theme and layout and then watched our ideas come to life. The wreaths of my childhood were purely decorative, but a fall wreath made from garden herbs is both aesthetically pleasing as well as useful to have in the kitchen.


Culinary Fall Wreath Inspiration
I got the idea to make a fall wreath with garden herbs when I was teaching workshops for the Arizona Herb Association and Maricopa County Master Gardeners. The Master Gardeners tended a learning garden and had an abundance of herbs on hand in the late summer; I wanted to find a way to take advantage of that abundance for our workshops. I originally thought about buying the grapevine bases for the wreaths at the craft store, but one of the Herb Association members grew grapevines in her backyard, so we were able to use them to make our own wreath bases.
Winding our wreath bases, playing with different ideas for wreath layout, and enjoying making something both functional and beautiful, we had such a good time at that workshop. Instead of hanging the wreath on my front door, I prefer to display it next to the stove so that it’s easily accessible while I’m cooking. When I want a savory herb I’ll just pull what I need from the wreath, crush the dried leaves in my hand and sprinkle them into whatever I’m making. If this preservation method sounds like something you’d like to try, here’s what you’ll need to craft your own.

Culinary Fall Wreath Supplies
Here’s a list of all the supplies you’ll need with a little explanation as to why I chose them.
Grapevine or Grapevine Wreath
To make your own wreath base, you’ll need a grapevine 8-10 feet long and no thicker than your pinky. Where I live in Ohio, wild grapevines abound and can be found even out behind strip malls and most apartment buildings. When harvesting grapevines, you want to harvest from a spot no higher than your own head. Pulling vines down from overhead could potentially bring whatever they are growing on down with the vine. Find the growing end of the vine, and follow it back towards the plant’s roots until you have the length you need. You’ll need to cut the vine with garden shears.
If you don’t have access to grapevines where you live, you can just buy a grapevine wreath from a craft supply store. I love the natural look of a vine wreath base, and I have found that for the purpose of fastening the herbs around the base, this option offers the most versatility.
Garden Shears
You’ll want a sturdy pair of garden shears or garden scissors for cutting your grapevine to make your wreath base, for harvesting herbs, and for cutting the crafting wire you’ll use to build the wreath. Don’t use your good house scissors for tasks like these. Shears like these will get the job done.

Craft Wire
When selecting craft wire, choose a small and easily workable gauge (like the wire that is in twist ties). I find that crafting wire works very well for this purpose because you can really tighten the wire around the fresh vine and herbs so that as they lose water and shrink they still stay fastened to one another. I also find the finer gauges of wire render wire cutters unnecessary and are easy on the hands while you’re working with them.
Fresh Cut Herbs
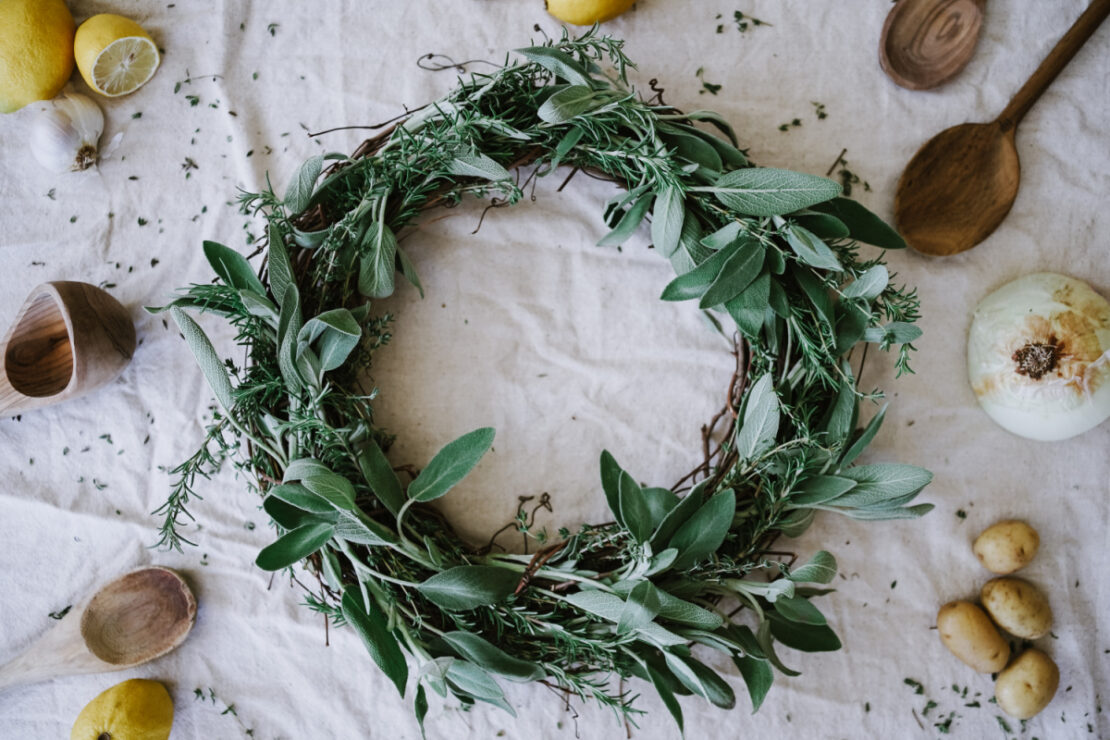
Generally speaking, the sturdier the herb, the better it is for crafting. I really appreciate the hardy square stems of the mint family members for this purpose. Culinary mints (Mentha spp.), basils (Ocimum spp.), sages and rosemary (Salvia spp.), thymes (Thymus spp.), and oreganos (Origanum spp.) all work very well for a culinary herbal wreath. Tonic herbs such as catnip (Nepeta cataria), mints (Mentha spp.), tulsi (Ocimum spp.), lemon verbena (Aloysia citrodora), and lavender (Lavandula spp.) can contribute to a tea-themed herbal wreath.
Now that we’ve covered the supplies, let’s look at the process and some tips for bringing all the pieces together.

Making the Fall Wreath
First, we’ll discuss how to weave your grapevine wreath base. If you do not have access to grapevines, then you can buy vine wreath bases of varying sizes online or at a craft store. (If you are purchasing your wreath base from the craft store you can skip this first part and meet us down in the third paragraph under this heading!) Once you have your length of grapevine, find the thicker end. Starting with the thicker end in one hand, make a small hoop no more than 1 foot in diameter. Then double the hoop. Securing the double hoop in one hand, begin to wind and weave the remaining length of vine around and through the double hoop with the other hand.
The further toward the end of the vine you get, the more pliable the vine becomes. Use the flexible durability of the vine to weave until you run out of vine. The more times you can wind the vine around itself, the more crooks and crannies you have for placing the herbs. Secure the finished wreath with craft wire.
Because this project uses fresh herbs, you’ll want to make sure you have your workspace ready to go before harvesting. A large table or a tablecloth laid out on the floor would work well for this activity, as you’ll want plenty of space to lay out your supplies where they can be seen and easily accessed. Place your grapevine wreath base closest to where you’ll be sitting in the workspace. Then cut your crafting wire into 3-inch pieces, and place those next to the wreath base. For a thin gauge craft wire, you don’t need wire cutters and you can just cut through it using garden shears.
Now that the workspace is set up, it’s time to harvest herbs for the wreath. As we discussed above, sturdier herbs work best for this. Cut full sprigs. Rather than just removing the leaves, we’ll use the stems to secure the herbs to the wreath. I like the length of my sprigs to vary somewhat between 3-5 inches, because having different lengths helps to add texture and dimension to the wreath. Don’t be sparing when harvesting; gather more than you think you’ll need for this project. This is an end-of-season activity and whatever doesn’t get used for the wreath can be dried or frozen.
Once you’ve harvested the herbs, lay them out on your workspace. I like to sort mine by type of herb and sprig length. This helps me to find my rhythm once I solidify my idea, and get into the groove of making the vision come to life. You’re almost ready to start attaching herbs to the grapevine base! However, before you begin to fasten herbs to the grapevine base I recommend placing them on the frame, trying different ideas to see which really speaks to you.

There are so many ways to decorate your fall wreath. You can place the herbs all facing one direction to create a flow of herbs around the wreath, or facing different directions to give it a more wild look. Try grouping the same type of herbs in sections around the wreath, or intermix them as you work. Experiment with leaving negative space in your fall wreath, concentrating the herbs on one side or the top or bottom of the wreath, leaving parts of the grapevine exposed. Play until you find a direction that flows well and pleases your eye.
Once you have found your creative vision and direction, begin placing the herbs on the grapevine base and securing them with the crafting wire. I like to group things like thyme, oregano, and marjoram into smaller bundles with sprigs of varying sizes. This adds volume and body to thinner stemmed herbs, and is less tedious than placing their sprigs singularly onto the frame. Thicker stemmed herbs, or herbs that are already well bunched like sages and rosemary work well when placed singularly as they naturally have more body than the thinner stemmed herbs.
Twist the craft wire around the herbs tightly. Both the grapevine and the herbs will shrink slightly as they lose water. The aim is to fasten the wire until it’s squeezing both the grapevine and herbs. Once the herbs are secured to the grapevine, you can wrap any excess wire around and back into the wreath. Continue with this until the wreath is decorated to your heart’s content.
Allow your fall wreath to dry for about a week on a flat surface. Doing this preserves your design, where hanging it before it dries will cause gravity to affect the shape of your design as the herbs lose moisture. Once it is dry, hang the wreath in your kitchen next to your stove or prep area. This way, you can easily grab a pinch or a handful of herbs when you’re cooking!

In Closing,
You don’t need much to create an aesthetic and functional fall wreath for your kitchen. Making an herbal wreath is a charming way to preserve an abundance of herbs at the end of your growing season. This herbal wreath offers a way to bring the green from the garden inside, and brighten up the home as we shift to the colder, shorter days of winter.

About Post Author